

Make a Sheep with our Needle Felting Kit
Needle Felted Sheep
This post provides instructions on how to make a Needle Felted Sheep from the materials provided in a kit offered by our shop, Soft Shetland Wool. The kit is ideal for someone who is a beginning needle felter, or who just wants an easy project to try needle felting. Each kit is based loosely on a ewe (female sheep) from our flock, and her photo is included with each kit. The wool materials for the kits are sourced from ewes in our flock of soft shetland sheep. The wool for each kit is one of a kind, so each will look a little different from the photos used in this tutorial.
Kit contents
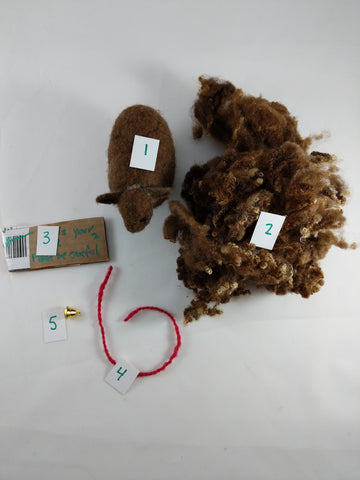
Every kit contains the following items:
| Item # | Qty | Description |
| 1 | 1 | Wool sheep base with feet, head, ears and face already assembled |
| 2 | 0.5 oz | Curly locks from our sheep sealed in ziplock plastic bag |
| 3 | 1 | 36 gauge triangle felting needle in cardboard holder, secured with tape |
| 4 | 3" | Handspun red yarn |
| 5 | 1 | Tiny gold bell with cute klanger |
You want to have a pair of needle nosed pliers and a very small crochet hook or diz hook on hand. The pliers are to make it easy to pull the wool out of the form if you make a mistake or don't care for the results. The crochet hook is used to thread materials through the loop of the bell.

Needlefelting basics
The needle used in needle felting has small barbs near the tip of the needle.
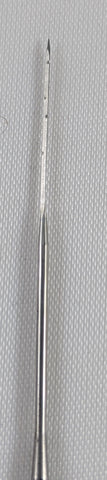
These barbs catch the loose fibers of wool and allow you to direct where those fibers end up in your creation. You can feel the barbs if you run your finger along the tip of the needle. There are all sorts of advanced techniques you can use to create lovely sculptures and designs, but we are going to keep it very simple for this craft.
The technique you are going to use is to simply poke enough loose fiber at the skin side of each curly lock into the one of a kind sheep form base that comes with your kit in order to secure the locks. You will also use your needle to place the coiled ends of the locks into place in an even distribution across the body of the form to create the appearance of a lovely curly fleece.
When you are not using your needle, it is good practice to jab it into a pin cushion, piece of foam or something that will protect you and your loved ones from accidently getting pricked by the very sharp tip. If you break the needle, its a good idea to slide it into the folds of a piece of cardboard and secure with tape before you toss it in the bin, in order to prevent injury for those handling the waste bag later on.

The nice thing about this needle felting project is if you don't like how it looks, you can easily pull the wool out of the form and start over! I keep a pair of needle nosed pliers on hand for this purpose.

Start with her fleece
To begin, lay out the curly locks on a flat surface with the skin side down. Almost as if you are laying out a fleece.

I try to provide the locks as a group from the same section of the fleece, so they will be held together as they are on a fleece. Some of the sections may be sticking together, so just very gently pull them apart and lay them out on a surface so you can see the top parts of the locks. Whenever you handle your curly locks, make sure you retain the coiled structure off the tips, that is what gives your sheep's fleece its charm!
I usually pull of about 5 tipped locks at a time to start.

After I pull away the 5 or so curled locks, I fluff up the bottom of the lock. This allows for the needle's barbs to have more surface area to grab on to so your locks will be nice and secure in the base form.

Set the locks on the body part of your sheep with the coils up and begin to gently poke at the open fibers on the bottom side of your lock so they go into the base.

I usually only submerge the needle to about 1 inch or so, just a nice little jab. Continue to jab in the loose fibers of the lock, going around the perimeter of your grouping of lock. Then carefully work the needle into the center part of your lock selection, making sure you only jab the loose wool that you see in between the coils, avoid jabbing your needle on the coils themselves, you want those to remain on the surface of your final fleece.
I like to have 2-3 millimeters in between each coil, so use that as your gauge for how densely to distribute the locks.
Grab another grouping of locks from your mini fleece and set on your form next to the wool you just completed needling and continue with short, gentle jabs to secure the lock and preserve the coils.
Keep doing this until the entire body is covered. Don't cover the feet, I just leave those bare.
After the body is covered with locks, go back over and tuck in any loose fibers that are closer to the coiled portions so the fleece looks nice and compact. I like the coils to have a smoother surface so I'll go over the whole fleece a few times tucking in non coiled bits until it looks like this:

You can leave the locks looser if you like a more fluffy looking fleece.
Then add the woolly poll
I like my ewe to have a sweet wooly poll (forehead) so here is how you do it. Grab a section of locks with approximately 8-10 coils. Fluff up the base as you did for the locks covering the body and then begin at the back of the head where it joins with the body and begin jabbing the loose fibers into her head. (sounds terrible doesn't it?)

Continue down until you reach just above her eyes. Then go back and gently tuck down the coils by grabbing fibers that are just under the coils and tucking them into the form. Use your needle to arrange and tuck the coils to your liking.

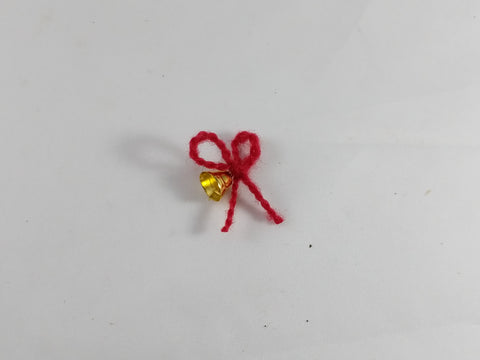
Top it off with a jaunty bell and bow
Final step! Take your hook tool and insert it through the loop in the bell and pull one half of the red yarn through. Tie the yarn into a nice bow.
Grab a small lock of wool, preferably a section that doesn't have as nice a coil to it.

Open up both ends of the lock so the fibers are separated to allow for easy needling.
Then, put your hook through the loop in the bell a second time and this time, grab the lock of wool which has both sides fibers nice and fluffy.

Align the lock so it is just about halfway through the loop on the bell, and then position the bell under her chin.

Begin to jab the loose wool with your needle into the join of her head and body. Make sure you jab a little on both sides of the bell loop so the bell is nice and secure. (don't be confused that my demo ewe doesn't have a fleece, this photo was taken for demo purposes only)
And there you have your sweet needle felted ewe!

I hope you like it!