
Spinning with the Majacraft Stylus Kit
The Majacraft Stylus Kit
I recently broke out the stylus kit and tried using it on my Majacraft Rose Wheel. I had been thinking about trying it for a while, but with the busy months of summer, I just never made the effort to carve out the block of time needed. I enjoy videoing myself trying things for the first time and then using the footage in my weekly vlog, "The Good of Work - Life on a Sheep Farm". I do this so as to show the genuine learning process which I think helps people get the confidence to try new things. In this blog post I am documenting my observations and results. I have used the stylus a bit more since cutting the "first time using video". I plan to create another video demonstrating the use which will be more of a tutorial to show how I use it properly
How to install the Majacraft Stylus Kit
The Stylus kit can be used on any Majacraft wheel, even old ones. To install the stylus kit, you have to remove your standard flyer and bobbin so the shaft is bare. Next, you need to disengage your brake band.

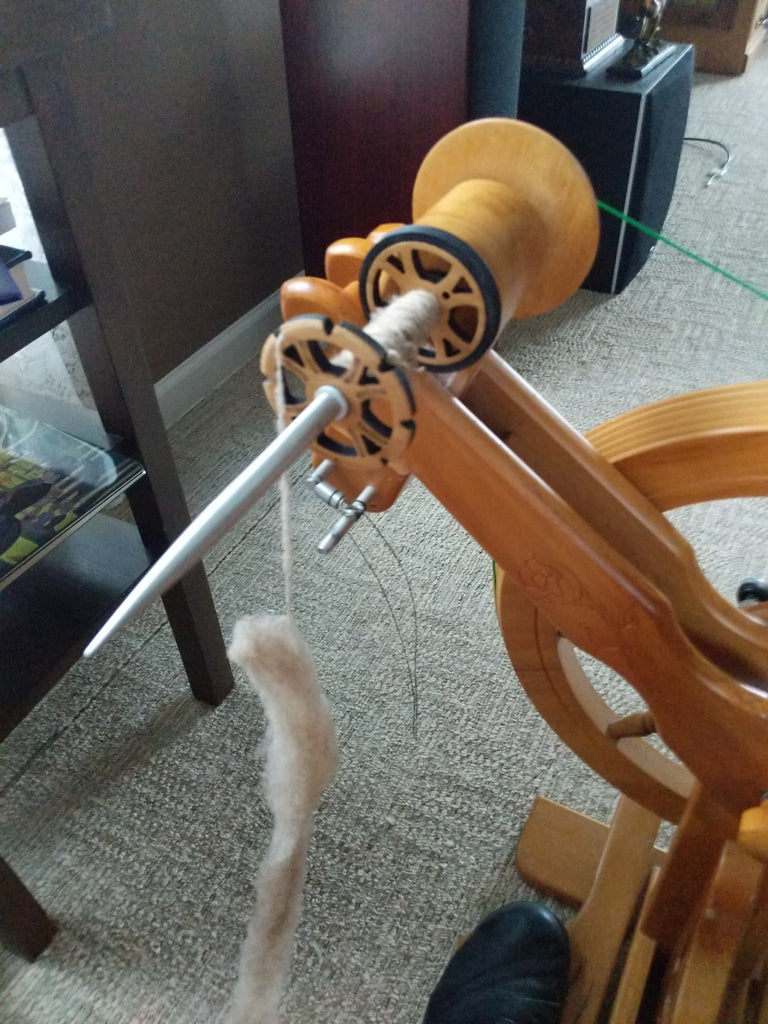
You do not use the scotch tension system with the stylus kit, rather the stylus spins in direct tandem with your drive wheel. Slide the stylus bobbin onto the shaft with the cutout grooves facing you.

Then you slide the stylus onto the shaft, engage the threads inside the stylus with those on the flyer shaft, and gently treadle to thread the stylus until it reaches a hard stop. Next, hand tighten by holding the whorl and giving the stylus a final hand tight torque.

If you are using the Aura, you can put the spring washer included with the kit in between the bobbin and the stylus as there isn't a collar which uses the same space as the spring washer.
Wheel adjustments for the Majacraft Stylus Kit
You want to set up your drive band to the fastest ratio you have available to you on your particular wheel. This means the largest diameter groove on your large drive wheel, and the smallest possible groove on your whorl or pulley.


This will ensure you get enough twist in your single to get a nice fine yarn. If you have a Rose or a Suzie, you can also loosen the knob in the center of your wheel and shift the head to the right or left so you have more room to draw your fiber out as you are spinning. Once you've shifted the head, retighten up the knob.

Now you are ready to spin with your stylus!
Starting out with your Majacraft Stylus Kit
Attach a leader to the stylus bobbin, making it approximately 2 feet. You want to have enough leader so that it extends a good 6 inches from the stylus tip to get a good start.

Begin to treadle so the main drive wheel is going in a clockwise direction. Hold the leader with your right hand and off to the right of the wheel so it can catch on one of the grooves of the stylus bobbin.

Then angle the leader slightly down and to the right so it brushes against the stylus and winds itself around the stylus as you treadle.

You will feel significant pull until you reach the tip of the stylus. Once your reach the tip, angle the leader at a 60° angle from the stylus.

I found when I tried to do unsupported long draw there was a loud repetitive snapping sound of the wool clipping the tip of the stylus, so what I do is support the single so there is slack between the tip of the stylus and my single. Then I allow the twist to work its way up to the drafting zone by using the supported long draw method of spinning. Sorry can't show this in photo as I am doing the photos and need the second hand to hold camera!

Once you are comfortable with the stylus on your wheel with the standard whorl, you can always amp up the volume by using a fast whorl and/or high speed head in order to fully optimize the twist in your fine single.
Go!
Once you have reached the full length of twisted single, you pause treadlling, reverse treadle just enough to disengage your single from the groove on the bobbin, and hold the single up at a 90° angle from the bobbin shaft and then treadle clockwise again to wind the single onto the stylus bobbin. I find I like about 8 inches of leader unwound to start me off spinning the next round. The actions of starting/stopping and reversing direction is where the ease of teadling and precise control over direction of the Majacraft wheels really shines.

I find i need about 8 inches of single to remain unwound to start me off spinning the next round.
What is the "point" of using a Majacraft Stylus Kit?
(Hee Hee sorry, couldn't resist). Anyways, there are a few reasons why you would want to use a stylus:
You can spin really fine yarn
Because there is no pull from the scotch tension system, you have plenty of time to ensure your very fine single has enough twist to have the strength that it won't break.
It's Faster
Once you perfect your technique, this method is a lot faster than spinning with the scotch tension system. I've yet to perfect my technique, so can't really validate this claim, but it is a claim I have heard.
It's Cooler
The stylus uses the same mechanics as some of the earliest methods used for spinning fiber into yarn - channeling spindle spinning and even the great wheel. Its cool to go back to the early days of spinning to gain an appreciation for the history of the craft.
Variety
As I become more seasoned (aka get old) I am finding that my hands need relief from repetitive motion. I spun thousands of miles of yarn over the last 20 years using one technique, short forward draw. It served me well, but now I find if I spin for too long using that method, my hands, tendons in my forearms and elbows get sore. Having another way to spin allows me to keep at it without pain.
Creative
Again, because there is no pull from the takeup of the scotch tension system, you have more control over the process. This allows you to add in bits and bobs at your leisure. This is a claim I read on the majacraft site, I haven't tried it yet, but it is on my list to try adding some curly bits of wool to my single for a artsy fartsy style yarn.
Finishing
Once you have filled all your bobbins, you can ply them with any of your Majacraft Lazy Kates, the stylus bobbin was designed to ensure you can use them on the standard lazy kates.

Michele C.
Perhaps if I bought this stylus for my new Aura, I might not miss my Great Wheel so much after I sell it before I move into my tiny house.